Stepping into the world of science fairs is an exhilarating journey, filled with discovery, experimentation, and a healthy dose of curiosity. You’ve spent hours brainstorming, researching, building, and observing. You’ve seen your hypothesis come to life, or perhaps taken an unexpected turn, leading you down an even more interesting path. All this incredible effort, however, culminates in one critical piece: the science fair research report. This isn’t just a formality; it’s your chance to tell the story of your scientific adventure, share your findings, and impress the judges with your understanding.
Let’s face it, translating all that hands-on work and intellectual heavy lifting into a coherent, well-organized document can feel a bit daunting. Where do you even begin? What absolutely *needs* to be included? How do you ensure your report clearly communicates your brilliant ideas and meticulous work? These are common questions, and finding the right structure is key to making your report shine and accurately reflect the hard work you’ve poured into your project.
That’s where having a clear, comprehensive guide or a science fair research report template comes into play. It provides a roadmap, ensuring you don’t miss any essential components while also helping you present your information in a logical and professional manner. Think of it as your blueprint for success, helping you transform raw data and observations into a compelling narrative that showcases your scientific prowess.
Building Blocks of a Stellar Science Fair Research Report
Creating a robust research report is like constructing a building; each section serves a specific purpose, contributing to the overall strength and clarity of your project’s narrative. A well-structured report not only makes it easier for judges to follow your work but also demonstrates your own understanding of the scientific method and your project’s significance. It’s about taking your audience on the same journey of discovery you experienced, from the initial question to the final conclusions.
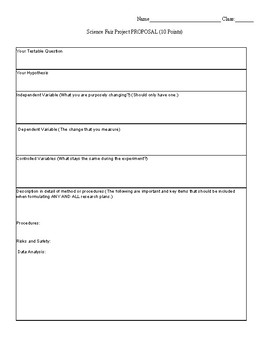
First impressions matter, so let’s start with the basics. Every good report begins with a Title Page, which should clearly state your project title, your name, the school, and the date. This is followed by an Abstract, a concise summary of your entire project – think of it as a sneak peek that highlights your purpose, methods, key results, and conclusions, all within a paragraph or two. Mastering the abstract is crucial, as it often determines whether a judge delves deeper into your full report.
Next comes the Introduction, which sets the stage for your research. Here, you’ll provide background information, explain the relevance of your topic, and clearly state your research question or problem. This section should build a case for why your project is important and what gap in knowledge it aims to address. It’s also where you’ll formally present your hypothesis – your educated guess about the outcome of your experiment.
Crafting Your Introduction and Hypothesis
Your introduction isn’t just a formality; it’s your chance to hook the reader. Start broad, introduce the general topic, then narrow it down to your specific area of investigation. What background research did you do? What existing knowledge or theories are you building upon? This context helps the reader understand the significance of your project. Conclude this section by clearly stating your specific research question and your testable hypothesis, often in an “If… then… because…” format.
Laying Out Your Materials and Methods
The Materials and Methods section is where you detail exactly how you conducted your experiment, leaving no room for ambiguity. The goal is for another scientist to be able to replicate your experiment purely by reading this section. Be precise and thorough. List all materials used, including specific quantities, brands, and equipment. Then, describe your procedure step-by-step, in chronological order, using clear and concise language. Don’t forget to mention any control groups, variables, and how you collected your data.
- List all materials with precise measurements and specifications (e.g., “500 ml beaker,” “pH meter calibrated to 0.01 accuracy,” “10 g sodium chloride”).
- Describe your experimental setup with enough detail for replication.
- Outline the step-by-step procedure, detailing each action taken.
- Identify and clearly state your independent, dependent, and controlled variables.
- Explain your data collection methods and how often measurements were taken.
Following this, you’ll present your Results. This is where you objectively report what you observed and measured. Use tables, graphs, and charts to visually represent your data effectively. While you’ll present the raw data, this section should focus on summarizing the patterns and trends without interpreting them. Save the “why” for the next section.
The Discussion section is your opportunity to interpret your results. Did your data support your hypothesis, or did it contradict it? Explain *why* you think your results turned out the way they did, relating them back to your background research. Discuss any potential sources of error, limitations of your experiment, and suggest areas for future research. This is where your critical thinking skills truly shine.
Refining Your Report for Maximum Impact
Beyond the structural elements, the way you present your information can significantly elevate your report. A well-written report isn’t just about having all the right sections; it’s about clarity, precision, and compelling communication. Proofreading is your best friend here. Read your report aloud, or ask someone else to read it, to catch grammatical errors, typos, and awkward phrasing. A clean, error-free report conveys professionalism and attention to detail.
Pay close attention to how you integrate your visual aids. Graphs and tables should be clearly labeled, easy to understand, and referenced within your text. They should complement your written explanations, not replace them. Make sure your captions are descriptive and your axes are clearly marked. The goal is for your visuals to enhance the reader’s understanding of your findings without requiring extensive deciphering.
Finally, remember that your science fair research report is a reflection of your scientific journey. Even if your experiment didn’t go exactly as planned, discussing the challenges, unexpected results, and lessons learned can be incredibly valuable. It demonstrates genuine scientific inquiry and adaptability. The process of putting together a detailed and thoughtful report using a solid science fair research report template not only helps you present your project effectively but also deepens your own understanding of your research.
- Start drafting your report early, don’t leave it to the last minute.
- Use clear, concise language; avoid jargon where simpler terms will suffice.
- Ensure consistency in formatting, terminology, and citation style throughout.
- Get feedback from teachers, mentors, or parents before finalizing.
- Practice presenting your project and referring to key points in your report.
By diligently following a structured approach and paying attention to both content and presentation, you’re not just writing a report; you’re articulating your scientific process and discoveries. This methodical documentation is a crucial skill, applicable far beyond the science fair, laying a strong foundation for future academic and professional endeavors. It shows that you understand not just the ‘what’ of your project, but also the ‘how’ and the ‘why.’
Embrace this opportunity to showcase your hard work and intellectual curiosity. A well-prepared report not only highlights your scientific acumen but also reflects your dedication and ability to communicate complex ideas clearly. It’s an invaluable part of the learning experience, setting you up for success, whether you win an award or simply gain a deeper appreciation for the scientific method.


